Back to the Bench

•April 12, 2013 • 4 Comments

First off, an apology. An apology to the large pile of neglected walnut in the corner of the shop (ok, let’s call it what it is…garage). I walk past that pile at least 3 times per day and get pangs of guilt every time I look at it. I made a promise to myself that this wouldn’t happen, that this project wouldn’t just become a dust covered pile of clutter, that I’d make the time to get this thing done and that the momentum I started with would keep on pushing me through.

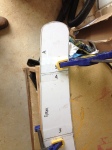
I kinda failed to deliver on that promise over the past several months. Let’s just say that life happened and now I’m back with renewed vim and vigor and ready to push forward. Truth be told, I’ve been wanting to get on with this for the last month or so but I also wanted to build a new bench to work on before I dove back in. I finished up the new bench last week, nothing special, just a laminated plywood affair with a reasonable quick release vise at one end. It will more than suffice.

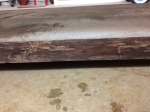
Here’s a not so great picture of it…Bench

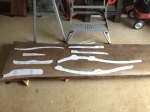
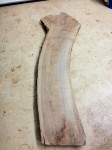
After completing the bench, I finally got around to making some headway on the seat. I had previously rough cut 5 seat boards with the intention of making a fancy contoured seat. This involves beveling the edge of each board and then gluing them up. You can get the general idea from the pine prototype I made a while back here http://wp.me/p2tKeA-1l .

Long story short, that idea was quickly curtailed by the annoying fact that if I beveled the edges of the seat boards, I’d lose sufficient width as to make the final seat too narrow. The one saving grace is that I figured that out ahead of time and didn’t have to throw a mantrum when i finally discovered my boo boo down the line. Looks like it’ll be a plain old flat bottom seat for this one.

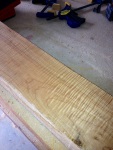
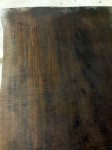
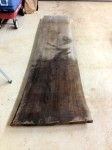
Here’s a pretty picture of the seat blanks mostly milled and ready to be rough cut (yes, I had to wipe them down with mineral spirits to see what it may sort of eventually look like once it’s finished…)photo 2

That’ll do for now, next up will be initial rough cutting of the seat boards, which I hope i don’t screw up too badly since there really is no going back from here on out…

Summer must be over….

•November 8, 2012 • 1 Comment

I know I know, it’s been a while. Get over it. Here’s the short short version of reason for the huge gap in activity…

Summer, 2500 Sqft vegetable garden, new baby, 2 year old boy, raising pigs, chickens, a full time job, grinding & pressing 400lbs of pears, making hard cider, friends & family visiting…you get the picture.

Anyway, with all that hullabaloo behind me, I finally found time to work my way back into the garage; and was met by the destruction of five month’s worth of “just toss it over there, we’ll take care of it later”. Cue 2 day garage cleanup (which actually took about 2 weeks). After getting the garage back into workable condition, I took a long hard look at the pile of Walnut sat in the corner. It was so tempting to just dive right in and start cutting & beveling & carving. Then reality set in. I have never done this before…I have just enough lumber to make the chair and not much room for oopsies.

I needed a better plan. That’s when the pile of 2x construction lumber propped against the wall started calling my name…It’s cheap, it’s abundant, it’s been sat in the shop forever so it’s nice and dry, if I screw it up, I’ll just burn it and start again. I grabbed a 2×12 and got to ripping that sucker down (I quickly discovered that the donated table saw needed the blade replacing, luckily I had somehow anticipated this and had a shiny new blade on standby). After a trip along the table saw, a quick hello to the miter saw and a couple of light passes over the jointer, I had some stock that vaguely resembled decent wood. This would do nicely as faux seat stock, all I had to do was bevel them on the saw appropriately and I’d be in business. The plans I have recommend a bevel of between 3 – 5 degrees, I started with 4 (being the middle of the road kinda guy that I am) but a test cut on some scrap made me increase the angle to a full 5 degrees (whoa there tiger…take it easy!).

I then set about beveling the seat blanks, to my surprise, this went without a hitch and I ended up with something closely resembling a bona-fide seat blank. I was so amazed that I had to go into the house and open a bottle of wine…

Here are the results…

This slideshow requires JavaScript.

Chop Shop…or Milling, Step 1.

•July 18, 2012 • 1 Comment

So after letting the Walnut acclimatize to the shop for a few weeks and get a little dryer (somewhere in the region 7%), I decided it was time to layout the various components of the chair and make some rough cuts so that the smaller pieces could further dry to around 5% moisture content, at which point they should be ready to mill to size.

Fast forward a few weeks (yes, I know, it’s been a while) and it’s time to make some rough cuts (I believe that they call this the Point of No Return…)
Here’s how things sit right now (actually, things are stickered and stacked on one side of the shop right now….)

This slideshow requires JavaScript.

Measuring Up

•June 4, 2012 • 2 Comments

So I may be a little bit too giddy about this, but, I just bought a new tape measure. One that lays flat on your workpiece. One that doesn’t have that annoying cup that allows you to extend the tape for a mile before it collapses on you (I believe it’s called stand out…correct me if I’m wrong). One that also happens to mark, with numbers, each increment down to 1/16th of an inch.
As a product of the metric system, I cannot even begin to tell you how much this excites me. No more brain frying interpretations of “well it kinda looks like 14/16ths” only to find out that my crappy eyesight was wrong (again) and now I have a piece that is over (or worse, under) sized that has to be fixed.

….and the numbers will set you free!

It’s the small victories folks!

This slideshow requires JavaScript.


A little grattitude…

•May 30, 2012 • Leave a Comment

Before I get too deep into this whole thing, I’d like throw out some thanks to a few people who have helped me along the way so far, whether it be inspiration, answering my inane questions, encouragement or sanity checks; Thank you in no particular order to:

Marc Spagnuolo @ thewoodwhisperer.com

Matt Vanderlist @ mattsbasementworkshop.com

Shannon Rogers @ renaissancewoodworker.com

The above three are collectively @ woodtalkonline.com

Bill Kappel @ kappelusa.com

My wife Heather @ home (no .com for that one…)

John @ eco wood systems

I’m sure I’m forgetting someone so if you believe I owe you a debt of gratitude, please let me know, either by email, comment here or simply smack me around the head the next time you see me.

Template Time

•May 30, 2012 • 1 Comment

Did I mention that I got hold of a good set of plans from a very nice gentleman named Bill Kappel (http://kappelusa.com) prior to jumping into this endeavor? He has already graciously offered his advice and wisdom on what path I might take to achieve my goal whilst still maintaining a modicum of sanity. Thank you Bill a thousand times (and a thousand more for the endless list of questions I will probably hit you with somewhere down the line). Anyway, to the point; with the plans I also took possession of a set of full size templates to assist in laying out and cutting the rough shapes for the various parts of the rocker (arms, back slats, runners etc). Over the Memorial Day Weekend, I managed to find the time mount these templates with spray adhesive to some 1/8″ plywood and then cut themĀ  out using the jigsaw. Just one of an innumerable amount boxes checked off the to do list.

Got Wood…

•May 29, 2012 • Leave a Comment

I tracked down some amazing Black Walnut for the rocker from a very nice man name John via Craigslist. He also had some pretty sweet Tiger Maple that I took off his hands for laminating into the rocker runners and some other accent pieces. To say I got a good, nay, a screaming deal, would be the understatement of the century. Here are some shots of the rough stock for delight and delectation.

Inaugural Build Blog – A Maloof Style Rocker

•May 29, 2012 • 1 Comment

Yes, I went and did it. I completely lost my mind. I am very much new to this whole hobby / pass time /addiction that is woodworking and I was searching for a project that would test my mettle.

Something that I could slowly chip away at (both physically and metaphorically) over an indeterminate period of time. Something that, if successful, would be both an extremely satisfying personal accomplishment and also something that would become an heirloom piece to hand down through the generations. Something that my kids can one day give to their own children and tell them about the time Grandpa had a midlife crisis and made a rocking chair…..I came up with, as my first foray into fine furniture, a Maloof style rocking chair. This is the point where any of you reading this who know anything about a Maloof style rocker need to stop laughing before you soil yourself and clean the beverage off of your computer screen…go ahead…I’ll wait. For those of you who have no inkling of what a Maloof style rocker is, here is a picture of a very fine one….


After doing a lot of reading on the feasibility of this madness, I decided to go ahead and try it anyway. With this blog I will attempt to document the trials, tribulations, perils, pitfalls, small victories and giant triumphs of the project. Wish me luck, or at the very least, shake your head in disbelief that a person could be so impervious to the obvious fact the odds are that this will not end well….


Stay tuned folks….it’s going to be quite the ride.